Category

eye makeup

Category

Hi all, how was your day? Mine was a boring one. No one likes to study all day!

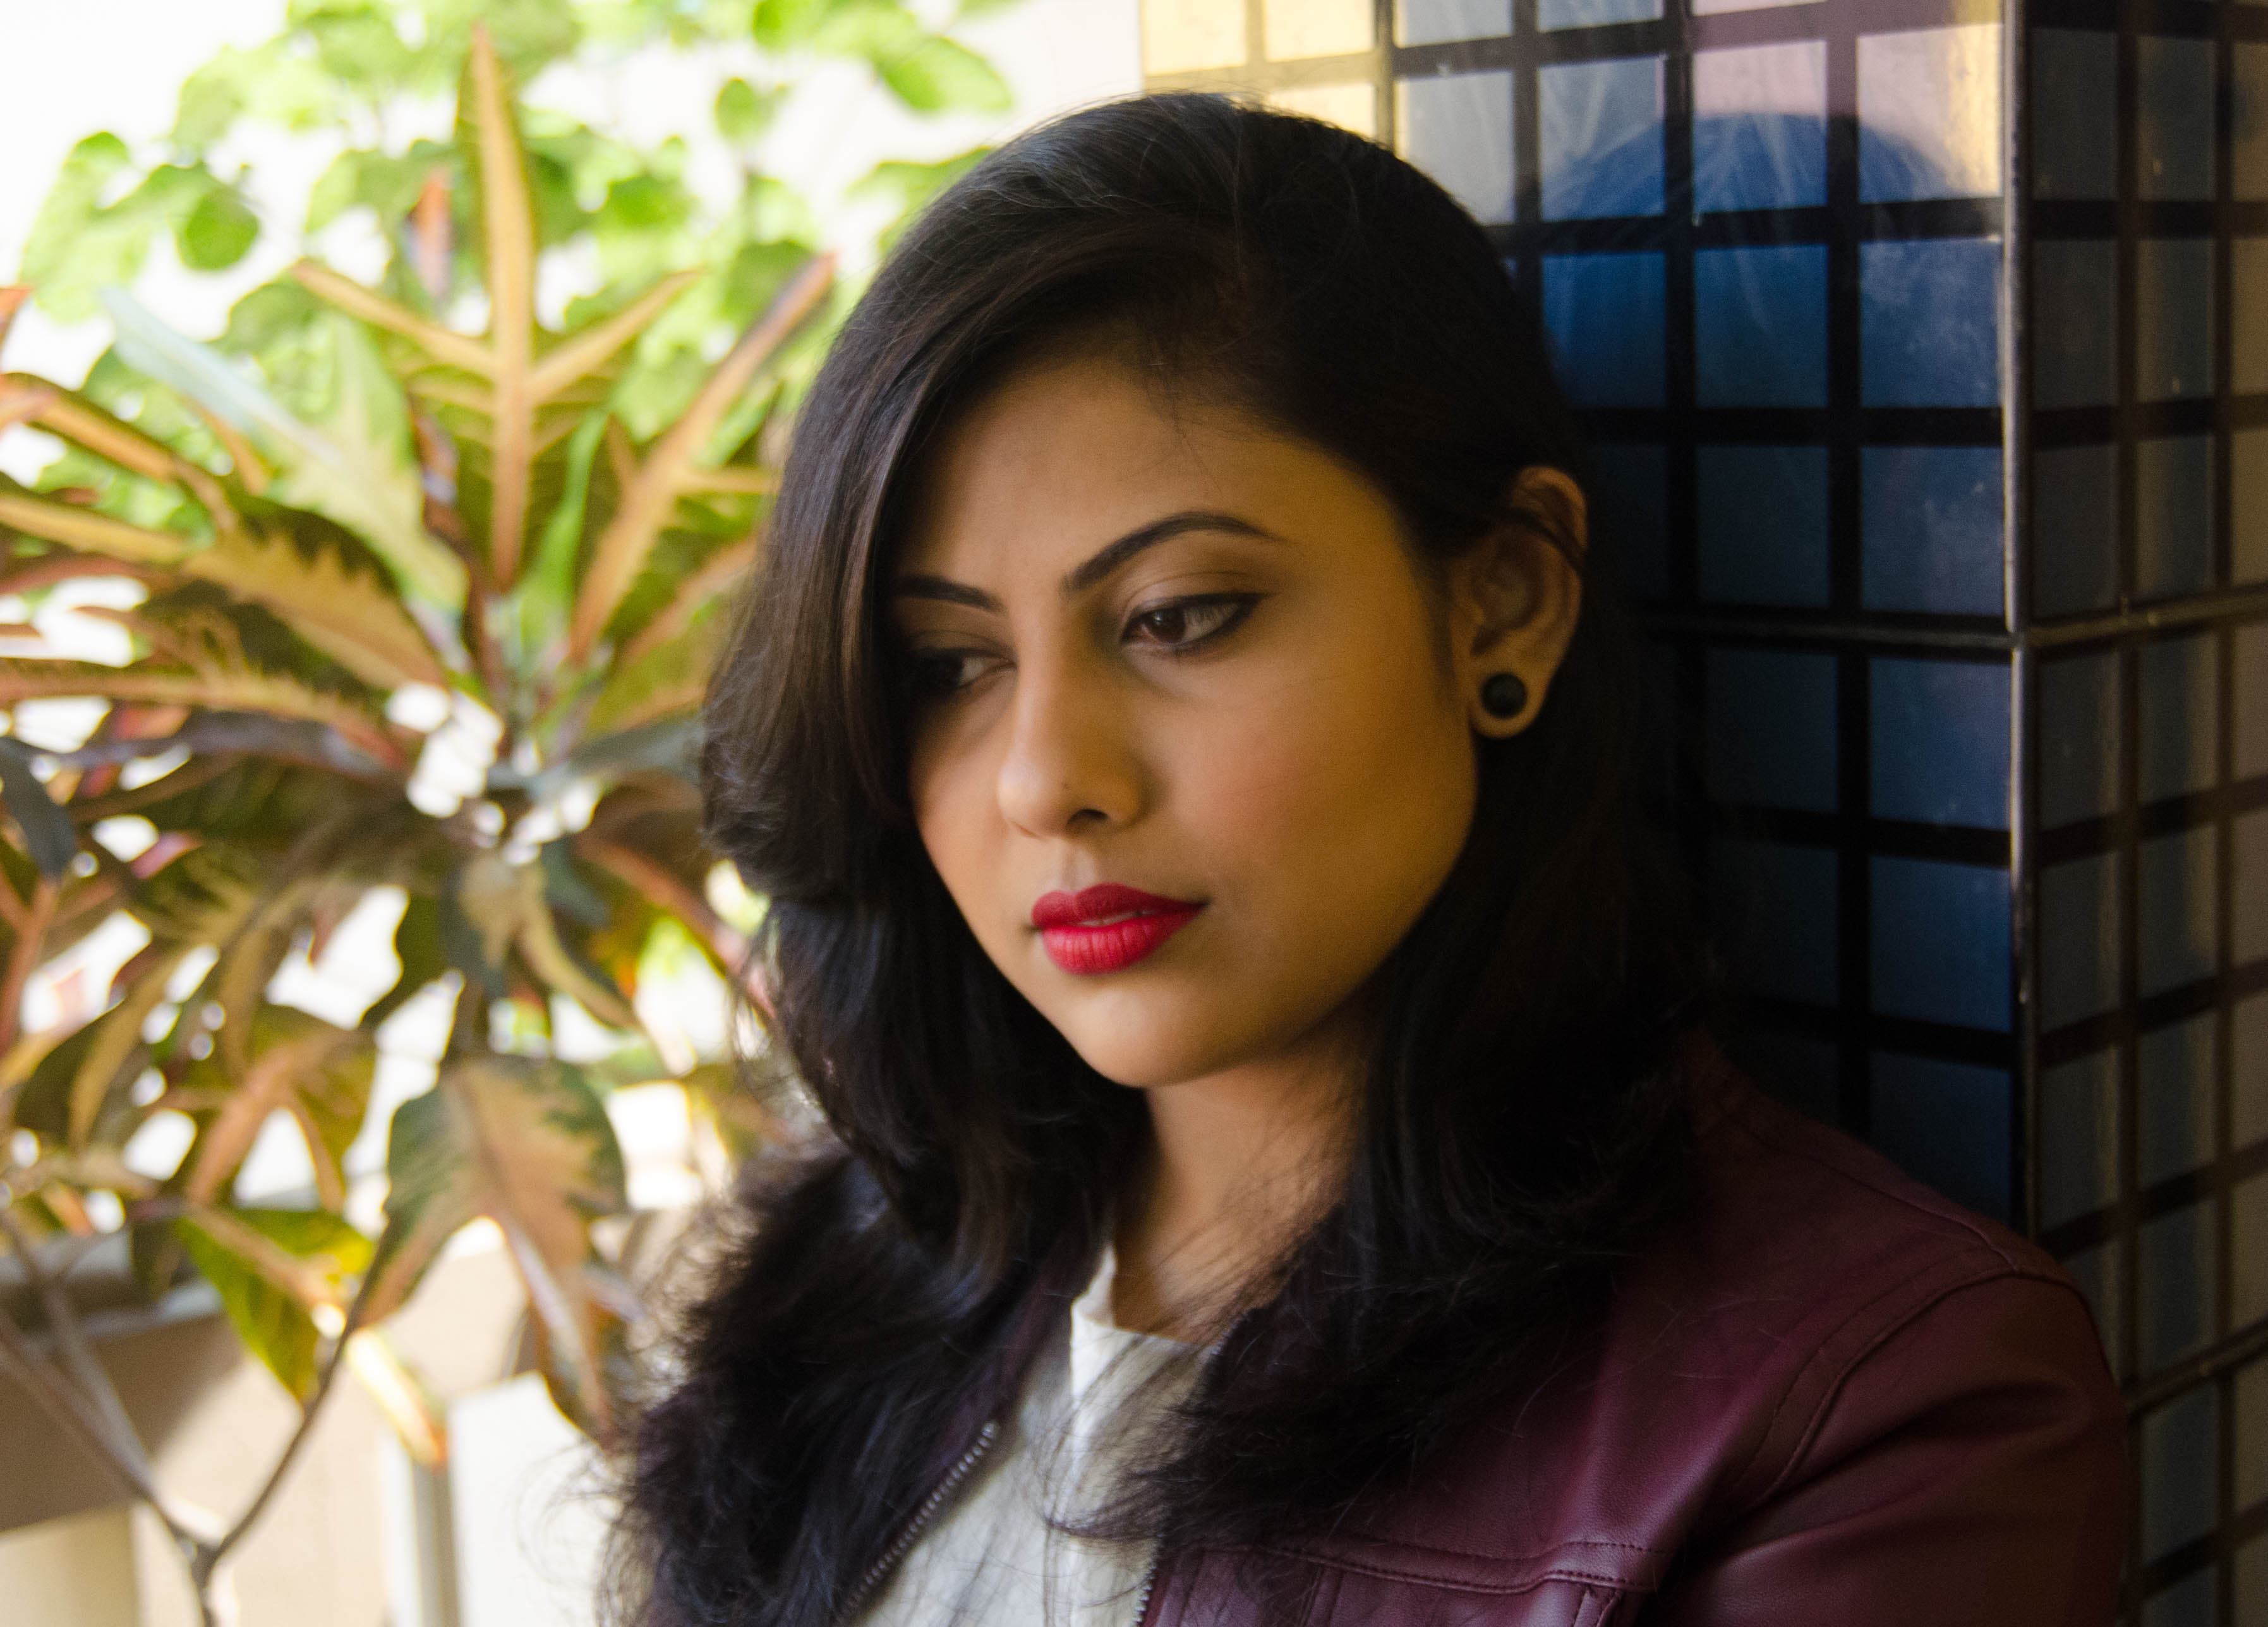
Anyways, today I have a very colourful post for you all. It’s March already, the transition time from Spring to Summer. Moreover, tomorrow is Bengal’s version of Holi. So, I thought of creating a look that is soft with a pop of colour. I chose the colours pink, peach and teal for this look. Have a look-


Products used-

(Face)

  • Lakme CC Cream
  • Kyolan Derma Colour Camouflage D-30
  • Maybelline Dream Lumi Touch Highlighting Concealer
  • NYX Blush in Bourgeois Pig
  • Lakme 9 to 5 Flawless Matte Complexion Compact
(Eyes)
  • E.L.F. Eye-lid Primer
  • Beauty UK Eyeshadow Palette- Soho (Used the 1st row, 2nd Shade from the left)
  • Maybelline Colossal Liner
  • Maybelline Colossal Kajal
  • Inglot AMC Gel Eyeliner- 87
  • Maybelline Hyper Curl Mascara
(Lips)
  • Colorbar Velvet Matte Lipstick- Thrilling Pink
  • Maybelline High Shine Lip Gloss- Electric Shock


How to Achieve the Look- 
Step 1: I started with my face first. I prepped my face with the Lakme CC Cream and then after color correcting my dark circles with the Kryolan Derma Color Camouflage cream, I concealed the under-eyes area and finished it off with a compact powder. Then I used a matte pink blush to the apples of my cheeks slightly dragging it diagonally. 
You can apply a highlighter too, but as my skin has started getting very oily, I skipped it. 
Step 2: Prep your eyes using a eyelid primer to prevent the eye-shadows from creasing. To make everything simple and short, I have used only one shadow to the lids. I took the peach-y shade from the Beauty UK palette, you can use any peach eye-shadow to achieve this look. After the eye-shadow, I then lined my upper lash-line with a liquid liner as thin as possible. Then, I tight-lined my eyes and applied a few coats of mascara only to the upper lashes. With the help of a stiff angled brush, I then lined my lower lash line with a teal coloured gel/cream eye-liner. This gives a sudden lift to the look.


Step 3: I applied a soft pink matte lipstick and then topped it off with a bright pink gloss. If you want the look to be less glossy, you can always blend the lip colours with the help of your finger.

That’s all, peeps! I hope you liked the look. The whole idea of this post is to share my ideas with you. You can always change the shades to create a whole new look as per your liking. If you ever re-create this look, don’t forget to share your pictures with me. I would like to showcase them on my social media. I will be back again very soon with a new post for you. Till then stay safe and keep smiling! Happy Holi in advance! 
Save water, be kind to animals and celebrate the festival of colours safely and sincerely. Lots of love. 
 photo CDC9FF6FF5EC04AD8EE1C7D59049EBD7_zpsec8626b0.png
Hi all, tomorrow is Valentine’s Day, a special day for all those who are in love. Though I don’t believe that one needs a specific day to express or celebrate love, I don’t even criticize the mood of Valentine’s. It has a certain flavor to it. No matter if you are single or taken, you can enjoy Valentine’s Day in your own way. For those who have a special plan tomorrow and haven’t decided what makeup should be done, here I have a simple, easy and quick makeup-look for you.
My boyfriend and I usually do not go out on Valentine’s Day (we have another special day), but if we ever plan one in future I would like to go for a soft and natural look (you know men, they love bare faces!) with subtle lipstick. That is my kind of a Valentine’s makeup. I have created this look for day time, you can always transform it to a night time glam look just by switching some things up. I’d tell you in the end. Keep on reading.
Products Used-

(Eyes)
  • E.L.F. Eye-lid Primer
  • Too Faced Chocolate Bar Palette
  • Maybelline Colossal Liner
  • Maybelline Hyper Curl Mascara


(Face)
  • Elisha Coy Always Nuddy CC Cream
  • Lotus Herbals Ecostay Foundation
  • Maybelline Dream Lumi Touch Highlighting Concealer
  • Lakme 9 to 5 Flawless Matte Complexion Compact
  • Accessorize Bronzing Block- Shade 3


(Lips)
  • LAQA & CO. Fat Lip Pencil in Jammy Bastard

This time, I have started with my eyes before doing my face. Here are the steps to achieve the eye look-
Step 1: Start with filling in with your brows. Use any technique you are comfortable with- pencils, powders or creams. You can’t afford to try new techniques on such an occasion.

Step 2: Apply some eye lid primer. It will help your eye-shadows stay longer and exact.

Step3: Take some dark brown eye-shadow in a fluffy brush/blending brush and apply it right onto the outer corner of your eyes and drag it along the crease. I have used ‘Semi-Sweet’ from the Too Faced Chocolate Bar Palette. [P.S.Your crease is where your eyelid folds.]


Step 4: Blend, blend and blend. Blending is the key. The more you blend the softer it looks.

Step 5: After you are satisfied with the blending, take some lighter shimmery shade in a flat shader brush and apply in right on to the middle of your eyelids. I have used a peach-y shade called ‘Marzipan’ from the Chocolate Bar Palette. [P.S.Shimmers help in reflecting light. If you’ve planned a candle-lit dinner, shimmery or metallic eye-shadows are must. It doesn’t have to be truckloads of shimmer, just a little hint would do. Subtle shimmers can be used even for daytime looks.]


Step 6: Apply a highlighting colour, close to your skin tone, on the brow bones. I have used the shade ‘White Chocolate‘ from the Chocolate Bar Palette.


Step 7: With an angled brush, apply the same dark brown shade along your lower lash line.

Step 8: Apply the same highlighting colour on the inner corners of your eyes. It would make them look bigger. 

Step 9: Apply a liquid liner as close to your lash line as possible. You might not go for a full-fledged winged eye-liner but a little flick at the corners would definitely make your bae fall for you once again.


Step 10: Curl your lashes and apply generous coats of mascara. Remember, mascara is the elixir of a neutral look.
Soft & Coral Valentine’s Day Makeup Look| Step by Step Tutorial

For the face, I have just applied foundation and concealer. Applied some coral blush starting from the apple of my cheeks slightly dragging the brush diagonally along the cheek bones. For my lips, I have applied a coral lip tint which gives the look a softer finish. This look is perfect for both day and night time but if you want to go for a more glam look you can transform this look by applying a kohl on the waterline, slightly smudging it and by swapping this lip colour with a red lipstick.
Soft & Coral Valentine’s Day Makeup Look| Step by Step Tutorial

Soft & Coral Valentine’s Day Makeup Look| Step by Step Tutorial
Just as I said earlier, Valentine’s Day is all about you. Being you is most important. Makeup can help you look better but you are what you are inside. That cannot be changed. If you don’t like makeup, be a rebel- rock your distressed jeans and loose tees, ditch the lipstick, be a tomboy. It doesn’t matter until you are yourself. Happy Valentine’s Day.

I hope you liked the look. Do comment and share your views with me. If you recreate this look, do share them with me. Tag me in your photos on Instagram and I’d repost some of your looks. Keep then stay safe and keep smiling.

 photo CDC9FF6FF5EC04AD8EE1C7D59049EBD7_zpsec8626b0.png
Hi all! It’s been a long time since my first and so far last eye makeup tutorial which was posted in the month of February. As the festival of lights and glamour a.k.a Diwali is around the corner, I thought of doing another makeup tutorial for you, theme being the lights and sparkles of Diwali. You must agree with me that nothing comes in mind except for golden eye-makeup when it comes to Indian festive makeup look.
Here is my look inspired by the glitz and glam of the most glamorous Indian festival. Hope you enjoy it. Please read this post till the end for the disclaimer. Now, let’s get into the post-
Products Used-


(Face)
Ponds’ BB Cream
Maybelline Dream Lumi Touch Concealer
Lakme 9 to 5 Flawless Matte Complexion Compact
L’Oreal True Match Blush in Rosy Cheeks

(Eyes)
ELF Eyelid Primer
Maybelline Color Tattoo in Bold Gold
MUA Glamour Nights Palette (Golden and Black)
MUA Undressed Palette (Shade 1)
Maybelline Colossal Kajal
MUA Eyeliner (White)
Maybelline The Volume Express Mascara

(Brows)
MUA Glamour Nights Palette (Black)

(Lips)
Colorbar Velvet Matte Lipstick- Oh My Magenta
Essence XXXL Shine Lipgloss- True Love

(Brushes & Tools)
Real Techniques Expert Face Brush
Faces Eye Shader Brush
ELF Small Angled Brush
Colorbar Emphaseyes Blending Brush
ELF Crease Brush
Faces Eyelash Curler
Gone Gold | Simple and Easy Festive Makeup Tutorial (Step by Step)

Step 1: Prep your face with your favourite foundation and concealer and set it with a compact or loose powder.
Step 2: Fill in your brows with a black or deep brown eye shadow or eyebrow powder understanding your skin-tone. [Tip: Use an angled brush to fill in your eye-brows. It works precisely on the arches.]
Step 3: Prime your eyelids with any eyelid primer. I have used my favourite ELF eyelid primer. This step is mandatory in order to make your eye makeup last longer no matter how long you let yourself on the dance-floor.
Step 4: Now, apply the Maybelline Color Tattoo in Bold Gold all over your lids, leaving the crease area. This will act as a base and will give your eye shadows something to stick to. [Tip: Apply the product with your finger. It will allow you to work smooth and it will distribute the product evenly on the lids.]
Step 5: Apply a golden eye shadow that best matches your skin all over the lids with the help of a good shader brush. Here you can also use your fingers to apply the eye shadow.
Gone Gold | Simple and Easy Festive Makeup Tutorial (Step by Step)
Step 6: Take a crease brush and apply a little bit of any matte black eye shadow and dab it on the outer ‘v’ of your eyes. Don’t overdo it. We just want a subtle hint of black to eliminate the flatness of the eye look and add a little definition.  
Step 7: Blend it very well with a fluffy blending brush. [Tip: When you are using a black eye-shadow, make sure you blend it extra carefully. Don’t drag it to the entire lid.]
Step 8: Tightline the upper waterline with a jet black kohl. I have used the Maybelline Colossal Kajal as it lasts long. Curl your lashes and apply multiple coats of mascara. Make sure you apply generous coats of mascara on top and bottom lashes as we are not using any eyeliner to define the eyes. In this case, mascara will do it. Apply a flesh-tone shade to the brow bones. [Tip: Use a long-wear and water-resistant eye-pencil for tightlining the eyes. It won’t transfer and won’t smear the eye with black kohl.]
Step 9: Apply white kohl on your lower waterline. With the help of the same angled brush and black eye-shadow you used for the eyebrows and trace along your lower lash line, leaving the inner corners of your eyes. [Tip: Applying white liner on the lower waterline creates the illusion of bigger eyes.]
Step 10: Final look.
Gone Gold | Simple and Easy Festive Makeup Tutorial (Step by Step)
You can use your choice of products, it’s not mandatory to use what I used.

~Finished look~

Gone Gold | Simple and Easy Festive Makeup Tutorial (Step by Step)

Disclaimer:
1. Makeup is not what I think is extremely important in our lives, nor that I preach that everyone should use makeup. Some like makeup and some don’t. It’s just like some people love dressing up and some love to be in their pajamas most of the time (Even I belong to the latter category :P). So, there is nothing wrong in doing makeup and nothing wrong in not doing it as well. One should not be judged in terms of their preferences.  
2. I am not a makeup guru, nor that am I claiming myself a makeup expert. It’s just what I tried on myself and wanted to share with all of you. There are many expert makeup artists and bloggers who are way better than me. I do not compare myself to them as I feel I have a long way to walk before I reach that level. Please do not judge me.

The title of the post makes me the ‘official Gone Girl fanatic’. LOL 😛

I hope you liked the look and the tutorial. Feel free to comment below. Show your love, write down your queries and expert advices. Love you all. Till next time. Bye J
Hello all! Today I have come up with a Valentine’s Day special eye look which is very simple to achieve and very wearable too. I am a totally no-eyeshadow girl. I mostly apply kajal on my upper and lower lash line and step out just like that. But, it’s Valentine’s Day, so the makeup needs to be special, isn’t it? I chose to create an easy-peasy look for the occasion as you don’t want to spend a lot of time in your eye-makeup. 
** I have done the makeup on my right eye only. I was too lazy that day so couldn’t do makeup on both my eyes. Excuse me for that. 
Now, without wasting time, let’s see the pictures-


~Things I used for this look~

1. MUA Undressed Palette.

2. Maybelline Lasting Drama Gel Liner in Black.
3. Florelle True Khol Pencil
4. Maybelline The Hyper Curl Volume Express Mascara.


Brushes & Tools-


5. Vega Angular Blender Brush.
6. ELF Essential Eye Crease Brush.
7. Kryolan Art Brush no. 3810.
8. Colorbar Emphaseyes Eye Blending Brush.
9. ELF Studio Small Angle Brush (my favourite for applying gel liners).
10. Vega Eyelash Curler.

~Eye-shadows Used in this Look~

Shade 1
Shade 9
Shade 2
Shade 10

Shade 3

~How to Achieve the Look~


Before I start creating the look, I lightly fill in my brows with a darker matte brown eye-shadow from the palette and shape it with a spooley brush. 

  • Step 1– Prep your eyes by applying a base for your shadow. If you have darker eyelids, you need to cover up the pigmentation by applying a concealer before the base. 

  • Step 2– Take shade 1 from the palette and apply it all over your eyelids up to the brow-bone using a fluffy brush. Here I have used the Colorbar Blending brush. This step is intended to cancel out any discolouration that you are still left with. This step is completely optional. 

  • Step 3– Take shade 2 and pat it over your lids with a flat eye-shader brush all the way to your crease area. I have used the Vega angular brush for the purpose.

  • Step 4– Next take shade 9 from the palette which is a beautiful pinky-brown shadow and apply it over the lid. You may apply it with a damped brush. That will make the colour more gorgeous. But, as I tried to create a soft and subtle look, I didn’t do that. 

  • Step 5– Take some of shade 10 in a crease brush and apply it on to your crease area.

  • Step 6– To blend in the harsh lines, take some of the light brown shadow, i.e. shade 3, in a blending brush and start blending everything in a back and forth motion. 

  • Step 7– Apply some more shade 1 on the brow-bone for highlighting. 

  • Step 8– Take shade 2 again and apply in on the inner-corners of the eyes to brighten them up. Also this creates an illusion of wide eyes. 

  • Step 9– As the eye look was very simple and subtle, I decided to go for a winger liner to add a little oomph to the look 😉 I chose gel liner over liquid liner to maintain the subtlety of the look. If you feel creating a wing is difficult for you then just do it as you like Jthere are no strict rules. 

  • Step 10– Apply kajal on your lower waterline leaving the inner ⅓ of the lower lash line and smudge it out a bit. Work it out on the outer corners and join the upper and lower lash-line with the kajal. Add some of shade 2 on to that unfilled ⅓ part. This will make your eyes look bigger. 

  • Step 11– Apply two coats of mascara to both top and bottom lashes.  

  • Step 12– Last step, dip your powder brush in to your compact/loose powder and brush off the fallouts under your eyes.

Voila! That’s it guys. I hope I have made myself clear while explaining the steps. Now a few words before I sign off. Valentine’s Day is all about love. If you have love for something or someone you will achieve it in anyway. You don’t need makeup to impress anyone. It’s your inner beauty and your self confidence that makes you stand out from the crowd. Make-up is just a way to enhance your beauty a little more.  This particular look has no rules. You don’t need the particular products I’ve used here. You can your anything similar to the products I’ve used. At the end of the day, what really matters is your happiness. I think, that will be enough for your loved ones.

Happy Valentine’s Day!

Those who are single, you don’t need to worry. You can also go for this look too. You don’t need any reason to look beautiful, right?

P.S.– I was always hesitant of posting eye-looks. I wasn’t sure of my ability to bring out a new look myself. But, I have got a grip on that and finally decided to share a look with you all. It’s my first time posting eye makeup looks. Also, my first ever eye makeup tutorial. I know there must be some flaws. I would like to get suggestions from you guys. Good night lovelies

P.P.S.- Excuse my eyebrows :p

Hello lovelies, I hope you’re doing great this year. This year has started off really well and I hope the goodness pursues. This post is a monthly favourites post. This will be my first ‘favourites’ post and henceforth I will be doing similar posts for every month.

Today I am going to share with you guys the products I loved using in January. So here they are-

~Skincare Products~


1. I Love… Strawberries & Milkshake Body Butter: A few months back I won a giveaway at Shubha’s blog, Blue Velvet Addict and this product, with some other goodies, came as a prize. I was using my Vaseline body lotion then but I was really getting eager to try out the body butter as soon as possible. I started using it in January. I love, love, love this product!! I don’t know if I have succeeded in make you understand how deeply I am in love with this or not, but I meant each word that I just scribbled. It smells like strawberry and cream and kind of strawberry smoothie, whatever it is, it has a divine smell. I like to apply it on my hands after bath. It makes my skin supple throughout the day and makes me smell like dessert 😛

2. Naked Potion Lotion: The moment I received it in my January Fab Bag, I started using it. I have not used it throughout January but still it is my favourite for this month. In case you guys are wondering, Naked is an organic skincare line by supermodel Lisa Haydon. The Potion Lotion is actually a face moisturizer which makes my face nourished, healthy and also it makes my skin look beautifully dewy. What I loved about the cream is the not-so-thick not-so-light perfect texture, the visible effects and its natural ingredients. It has a weird smell which initially made me a little irritated but now I like the natural, non-chemical smell. As it’s very moisturizing, I have to use it up within this winter because I might not be able to use it in the summers as I have a very oily t-zone which makes my entire face greasy L I am planning to do an entire blog-post on this product.


3. Lotus Herbals 3-in-1 Matte Look Daily Sunblock: This product is my all time favourite. I am sure everyone among you knows about this product quite well. This is my favourite because- (a) It has a matte formula which is hard to find in a sunscreen (b) It smells good, (c) It is super inexpensive. Also it has SPF 40 and UVA and UVB protection as well. I will keep purchasing it always.

~Haircare Products~


4. Pre-Botanix Anti-dandruff Shampoo and Conditioner by Raaga Professional: Since my hair is super oily and full of dandruff throughout the winter, I needed an extremely good shampoo to get rid of the flaky scalp. This shampoo and conditioner duo was actually recommended by my hair-stylist. I have been using this from the first week of January. I use it every 2ndday and it claims to show you visible difference with 4 weeks. Well, for that matter, it’s my 3rd week with the product and I can see the lack of flakes in my hair. This shampoo doesn’t damage your hair and the conditioner is just the best. You don’t need to have dandruff problem to use the conditioner, you can use it with any shampoo. It makes your hair soft and touchable. I don’t know where else it’s available in India; I bought it from my salon friend. I recommend the Pro-Botanix Anti Dandruff shampoo if you’ve stubborn dandruff like I have.
~Makeup Products~


5. Maybelline The Hyper Curl Volume Express Mascara: This has been my HG mascara ever since I started using it! This mascara has everything you need for your lashes. It stretches, lengthens, curls and gives an amazing effect to your eyes.


6. Maybelline Super Stay 14hr Lipstick- Eternal Rose: Since I am into blod lippies for this month, this has been my favourite. It is a lovely rosy pink colour which suits me a lot. It just brightens up my face. Only one down point for this lipstick could be its drying tendency. Otherwise everything is great with it. It’s matte, it’s bold and it’s pretty!


7. Maybelline Eyestudio Lasting Drama Gel EyeLiner: This is my first time trying out a gel liner. I needed one and felt to try the Maybelline one first. Reason- its reasonable price. I have loved this so much that I keep this on the top of my vanity table so that I can grab it anytime. This is my favourite go to eyeliner now.


8. Revlon Colorstay Eyeliner: I was too much into eye makeup products this January. Recently I ran out of my Maybelline Colossal Kajal and I went on shopping to buy the most raved Loreal Kajal Magique. But sadly, the nearby departmental store didn’t have that in stock. So, I opted for the one that was available there. It was the Revlon Colorstay Eyeliner. I have used it before and I love this product so much. I love applying it on both upper and lower lash line. It has an intense black colour and it glides on very well. 


9. Kryolan Dermacolor Camouflage Crème: If you are following my blog, you guys must have seen my review about this product. I have loved this product since I purchased it. This is my HG product to camouflage my wretched dark circles. I apply it underneath my eyes and top it up with my concealer and I am ready to go. This product is worth being in the ‘Favourites’ list.
Read my review here.

So, this is pretty much it. I think I’ve discussed about all the products. These products were my favourites for the month of January. Some of them might become my all time favourites. I hope you’ll have enjoyed reading my post. See you in my next post 🙂
Hello lovelies, as promised I am back again with another new post. This is going to be a review post. Today I am going to review a super awesome orange corrector form Kryolan which is the Kryolan Derma Color Camouflage Crème in the shade D30.
In case you are wondering what a corrector is, it is a cream that helps to camouflage any dark circle, dark spot, pigmentation or redness. It basically hides all the discolorations in the skin and makes your skin spotless and flawless when a concealer is applied on the top of it. An orange corrector is basically needed to camouflage blue tones in your skin. It also fights ashy-ness that appears under your eyes when you apply just a concealer to conceal your dark circles (if you have heavy dark circles).
The Derma Color range is a range of creamy concealers. This range offers a great variety of shades. D30 is one of them, which is an orange corrector. This range has other shades of correctors too, like, lavender, yellow etc.
Source
What the Website says: “Dermacolor Camouflage Creme in a handy round packaging. Dermacolor Camouflage Creme is an especially highly pigmented make-up which is designed to correct and cover skin disfigurements, discolorations and tattoos. Dermacolor Camouflage Creme is especially suitable for face and neck. With proper use of the Dermacolor Camouflage System skin abnormalities can be easily corrected. Ones Dermacolor Camouflage Creme is fixed using Fixing Powder and Fixing Spray from Dermacolor it will be waterproof and protects the skin against damaging UV radiation. Dermacolor Camouflage could last even under extreme conditions like swimming, heat and physical strain. Dermacolor Camouflage Creme is available in an extensive range of shades and those are intermixable which gives the make-up a natural appearance when applied correctly. ECARF certified.
Product Category– Corrector
Brand– Kryolan
Price– 350 INR for 4g
Packaging: Kryolan Derma Color Camouflage Crème comes in a tub packaging with a screw-on cap.
My Experience: Kryolan Derma Color Camouflage Crème in D30 does a great job to hide your stubborn under eye dark circles as well as the imperfections and unwanted pigmentation in your face. It might tend to be a little dry on skin. You have to scoop out a small amount of it and rub it on the back of your palm to warm it up a little bit. I love to use this corrector after moisturizing my under eye area, this helps the cream to glide on the area easily. It makes a noticeable difference in your under eye area after application. As I have heavy dark circles, this correction is a life-saver for me. I like to apply a moisturizer under my eyes and then apply the Kryolan Derma Color Camouflage Crème in dots around my under eye area and then finish it off with applying my favourite concealer. I like to do this every time before going out. I don’t like the tub packaging, it would have been good if they change the packaging to a stick type packaging. 

Here is a quick demo for you guys. This is my first time so please forgive me for any mistake 🙂
1. Bare eyes  
2. Dotted with Kryolan Derma Color Camouflage Creme (D30)
3. Blended  
4. After applying concealer


Ups: 
Hides all type of discoloration completely, like magic.
Affordable.
A little goes a long way.
 
Downs: 
Availability must be a con.
Blending can be a little tricky.
Unhygienic packaging.

Will I buy it again: Yes, of course, as soon as I finish it. 
I highly recommend this wonderful corrector to all who have dark under-eyes or obstinate pigmentation.

As a makeup lover, I always wanted to have MUA products in my vanity. Since I don’t have a Paypal account I never could buy these awesome international products. But, when I saw MUA Glamour Nights palette is on sale at Jabong, I couldn’t resist myself. I bought it and now I am going to review and swatch it. I know many of you have done this before but I wanted to do it because I loved it so much and want to share with you J

Product Category: Eye shadow
Brand: MUA
Price: £4.00 
Packaging: I must say that the packaging is very sleek and has a professional touch to it. It’s so sleek that it can be easily carried in a clutch. It doesn’t come with a mirror; instead, it has a clear lid to it. It comes with a double-ended eye shadow applicator.
Shades: This palette has 12 shades. 7 of them are matte and 5 are shimmery. The shades don’t have names to them. The colors are very pigmented and stays for a long time. The colors are so pigmented that they show up properly without even applying a primer. Matte shades are really stays on the lid and the shimmery ones too don’t go all over the face. Shimmery shades are more pigmented than the matte shades and lighter shades have a poor pigmentation. 

The Swatches

The Top Row

The Bottom Row

I have swatched on my bare hand, without applying a primer or something else.
Pros:
  • It’s highly pigmented. The color pay-off is commendable.
  • Staying power is really good.
  • Assortment of the colors is very nice.
  • Convenient packaging.

Cons:

  • Availability.
  • Lighter shades are poorly pigmented.
  • Some of the shimmery shades might have fall outs.
Verdict: Glamour Nights is a great palette with 12 pigmented colors. All the shades are wearable and they are exactly what you need to do an eye makeup for a party. But, you can even create a day look using the matte colors. I will try to do a tutorial on that. Glamour Nights Palette is overall a good product to be in your vanity. This is certainly a great eye shadow palette in such a cheap price. I wish India had a good enough collection of MUA. Purchasing from the MUA website is good but the shipping charge is almost double the price. I recommend this product. 
My rating: I would give it a 4/5

Would I buy it again: As soon as I run out of it!
I have bought it from Jabong. It was actually priced 899 INR with a discount on the website but I got a discount of Rs 500 from the website. Jabong has a decent collection of MUA products. You can check here.
Pin It